Posts tagged ‘DIY’
jars, jars and… more jars!
I’ve been collecting jars forever. Ok, it’s been maaaaybe a year, but it feels like forever! I kept seeing these cute DIY projects to do with mason jars and milk jars, and I thought, done and done! why not reuse my olive jars, spaghetti jars, and pickle jars? Why not go green? Why not!
Other than the fact I’ve become a serious pack rat with all these craft projects (my laundry room has turned into ‘craft crap’ room) I do have to say, the jars were a good thing to hoard. I’ve found many, many things to do with them! My toothbrush sits in a very fancy spice jar, my pens stand nicely in a mason jar on my desk, and a pickle jar has made a wonderful home for my dish scrubbing brush. How countrified! My first project was to dye these jars with food coloring and glue so they looked like colored glass. While I successfully dyed my countertops turquoise, I can’t say the same for my jars. The color was too faded and just weren’t worthy of sitting in my windows. It wouldn’t be the first pinterest project gone awry, but I decided to move onto my next craft – things to put in these jars. This seemed much easier anyway! For Christmas I like to make peppermint bark (mostly because it’s literally just heating up chocolate and breaking up candy canes) so I thought, I have all these silly jars, why not put candies in the jars in a cute way!
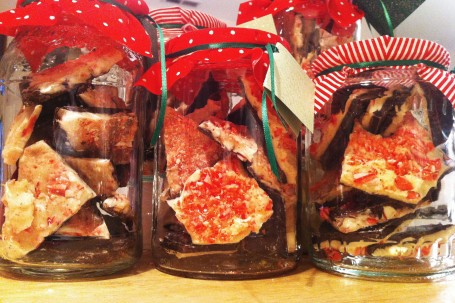
I found some cute red and white fabric to dress up the tops, tied em’ up with a green ribbon and viola! Cute, cheap, and resourceful!
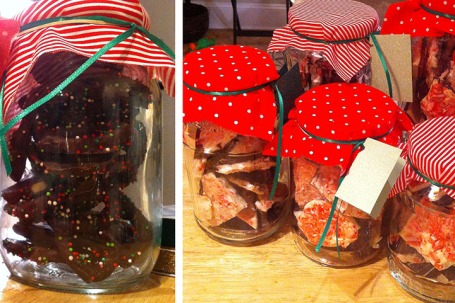 I also made some chocolate dipped pretzels for the folks who don’t like peppermint bark (crazies) which were very cute as well. Considering I have about 60 more jars, I just might have to put more presents in jars! I can only imagine the cute fabric for birthdays, or any other holiday! Stacking cookies or adding popcorn, oh! the possibilities! If I come up with something fabulous, i’ll make sure to document it!
super easy, super cute! diy calla lily centerpieces
 For starters, calla lilies are SO beautiful. So simple and elegant, and perfect! We picked the mango color for a fall reception, but they come in such a large variety of colors, they can be easily matched to any occasion! (thinking about it, I’d really love to do this with pink callas for a spring wedding, or yellow for a summer party…) anyway, I had seen a similar idea online, but added a few more cute details, and I’d have to say I loved how they turned out!
Depending on the size of the event, you’re gonna need quite a few wine bottles… SO GET DRINKING! We had 16 small tables and wanted 3 or 5 bottles at each table. So basically, I gave everyone I knew a drinking problem, and happily collected over 120 bottles (OK, OK most of them came from a friend who manages a bar…) but then I got creative with it, and tried to find the most interesting green bottles I could find: Perrier bottles, 40 oz beer bottles, champagne bottles, and olive oil bottles – you name I got it! The size differences really made them unique. I took the labels off by soaking them overnight in warm water and then scraping them with a razor. Most came off really easily, but for the tough ones – goo gone did the trick!

We ordered the calla lilies from a whole-saler, it’s much cheaper, and really there was no need for a florist! Along with the flowers curly willow was added – which has become my new infatuation – I want to do all sorts of crafts with this stuff! I cut the smaller branches and put them into the wine glasses – which really gave them an artistic look! I unfortunately didn’t have time to take any pictures once the reception started, but I know somebody did – so more to come! I also added some gold confetti pieces and tea lights to the tables, and they looked fabulous! Picture soft lighting with a little sparkle! The extra bottles were lined up against this window with a random flower every few bottles, and we added a few picture frames of the bride and groom in between them. It looked so nice! I was very proud of our all our efforts!

fancy DIY envelope liners
I Love them! I saw these liners at The Paper Source awhile back and have been lusting after them ever since! They are the perfect thing I need to spice up my brother’s wedding invitations! I decided to try and make my own to save a few dollars, The Paper Source has beautiful liners and paper, but can be tricky to use while on a budget.
1.) Choose a paper! The sky is really the limit here- I can only imagine using vellum and textured fiber paper (so cool!) but I chose a brown, seamless, floral patterned scrapbook paper (59 cents a sheet at Hobby Lobby) to go with the fall theme of my invite. The colors matched perfectly! Find some scrap cardstock to make a template. 2.) trace your envelope all the way around I used A2 envelopes from Paper Presentation. 3.) Next, cut 3/4″ off the bottom of your template. Place the template inside your envelope and it should fit just underneath the seal!
 4.) Line up your template to the edge of the pretty paper and trace. Lining it up allows you to use the already straight edges, and usually allows for more use- and Viola! You’ve made your liner! Once you’ve cut out all your liners, it’s time to crease them.
 5.) Take your envelope with the liner inside and fold over as you would to seal it, to crease the paper good before you glue it. This makes sealing the envelope easier. 6.) Take your Elmer’s rubber cement and score JUST the flap part of liner. Remember a little goes a long way – if you use less, you’ll avoid the mess! Let them sit for an hour or so before putting in the invitation, and you’re all set!
A beautiful detail to an otherwise ordinary envelope!
